OHMSS DBS Restoration Update
 Gebruder Gumbold
San FranciscoPosts: 549MI6 Agent
Hello Everyone,
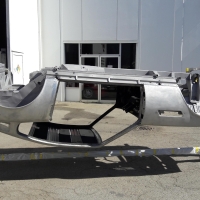
Her Majesty's DBS is progressing at a much slower pace than as originally planned. Progress is steady, just slow, and there have been some rather difficult and unforeseen setbacks: my first metal man met with a heart attack, and I waited over 8 months for him to recover, and he simply retired....so my second choice metal man was booked for nearly a year, then, as my date finally came up, went off to the Smithsonian to work on a huge job, leaving me to find yet another metal shaping guru. Kissed a few frogs, then landed who I thought was a very good, and highly recommended craftsman. I visited his facility and inspected his past work, and it all looked great. He accepted the job, and then suffered some serious health issues, and went out of action for 6 months. Another search, more frogs, and now I have a competent chap who should be able to bring her across the finish line, and get her to paint.
Meanwhile, I have not been idle, and have been working on stripping the underside to remove a previously horrible surface preparation job, and such sub assemblies as the Armstrong Selectaride rear dampers, the power steering reservoir assembly, exhaust manifolds, etc.
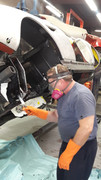
Yours truly experiencing the fun task of stripping the previous paint from the underside. The rotisserie is a Godsend, as 55 year old back and knees do not bend very well....
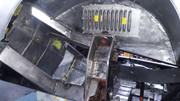
View of the RH front wheel well. Note the louvered plate, which shall be welded into place. That is correct for the early cars, such as DBS/5234/R, which was the Bond car. Louver pattern was highly researched to achieve the correct radius, and a special die had to be found, and the layout replicated correctly. Don't try this at home...
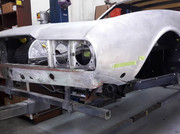
Cutting away the late S2 type front valance in anticipation of the new "sharknose" panel of the S1 cars.
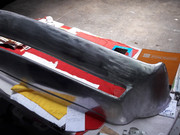
The long awaited sharknose front panel, which still needs 20 hours of straightening, and some corrections in the radius and opening areas.
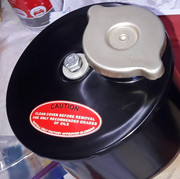
The power steering reservoir, now completed with the correctly plated dimpled bolts, and a reproduced decal that I had made by Isaydingdong. Really, that is their name...
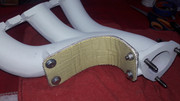
You would not believe the work that went in to a brand new factory manifold: the foundry that AML is using now is in India, and the mating surfaces were warped, and casting flaws and pit holes aplenty. Those had to be corrected by myself, a die grinder, and about 10 hours each. Next, special stanless steel studs were made, to prevent the rattling apart which plague DBS models, and the whole assemblies were jet coated in the factory white finish. Even the correct heat shield was a nightmare, as the original material was asbestos, which is illegal in most parts of the world now...so, a suitable material had to be found. A chance conversation with a motorbike restorer led me to this material, which looks the part, and will provide far better heat dispersal, and not crumble to d
lethal dust, as the original did.
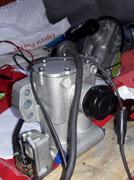
This was fun! These are the Armstrong Selectaride rear dampers, notorious for going out of sync with horrid results. I had the circuit boards, wiring harnesses, switch, damper bodies, etc all rebuilt, and here, we are testing them for sync.
Here is a video showing them in action:
https://www.youtube.com/watch?v=spsSpB78v9A&feature=youtu.be
Well, hope all of you in the AJB community are well, and that you have enjoyed this update.
Really disappointed that she won't be ready for the 2019 OHMSS tour, but she will be ready someday, and she will be the very best DBS that I can offer...
Please follow the continuing saga on my site: http://www.ohmssdbs.com/welcome/
Cheers, Tom
Her Majesty's DBS is progressing at a much slower pace than as originally planned. Progress is steady, just slow, and there have been some rather difficult and unforeseen setbacks: my first metal man met with a heart attack, and I waited over 8 months for him to recover, and he simply retired....so my second choice metal man was booked for nearly a year, then, as my date finally came up, went off to the Smithsonian to work on a huge job, leaving me to find yet another metal shaping guru. Kissed a few frogs, then landed who I thought was a very good, and highly recommended craftsman. I visited his facility and inspected his past work, and it all looked great. He accepted the job, and then suffered some serious health issues, and went out of action for 6 months. Another search, more frogs, and now I have a competent chap who should be able to bring her across the finish line, and get her to paint.
Meanwhile, I have not been idle, and have been working on stripping the underside to remove a previously horrible surface preparation job, and such sub assemblies as the Armstrong Selectaride rear dampers, the power steering reservoir assembly, exhaust manifolds, etc.

Yours truly experiencing the fun task of stripping the previous paint from the underside. The rotisserie is a Godsend, as 55 year old back and knees do not bend very well....

View of the RH front wheel well. Note the louvered plate, which shall be welded into place. That is correct for the early cars, such as DBS/5234/R, which was the Bond car. Louver pattern was highly researched to achieve the correct radius, and a special die had to be found, and the layout replicated correctly. Don't try this at home...

Cutting away the late S2 type front valance in anticipation of the new "sharknose" panel of the S1 cars.

The long awaited sharknose front panel, which still needs 20 hours of straightening, and some corrections in the radius and opening areas.

The power steering reservoir, now completed with the correctly plated dimpled bolts, and a reproduced decal that I had made by Isaydingdong. Really, that is their name...

You would not believe the work that went in to a brand new factory manifold: the foundry that AML is using now is in India, and the mating surfaces were warped, and casting flaws and pit holes aplenty. Those had to be corrected by myself, a die grinder, and about 10 hours each. Next, special stanless steel studs were made, to prevent the rattling apart which plague DBS models, and the whole assemblies were jet coated in the factory white finish. Even the correct heat shield was a nightmare, as the original material was asbestos, which is illegal in most parts of the world now...so, a suitable material had to be found. A chance conversation with a motorbike restorer led me to this material, which looks the part, and will provide far better heat dispersal, and not crumble to d
lethal dust, as the original did.

This was fun! These are the Armstrong Selectaride rear dampers, notorious for going out of sync with horrid results. I had the circuit boards, wiring harnesses, switch, damper bodies, etc all rebuilt, and here, we are testing them for sync.
Here is a video showing them in action:
https://www.youtube.com/watch?v=spsSpB78v9A&feature=youtu.be
Well, hope all of you in the AJB community are well, and that you have enjoyed this update.
Really disappointed that she won't be ready for the 2019 OHMSS tour, but she will be ready someday, and she will be the very best DBS that I can offer...
Please follow the continuing saga on my site: http://www.ohmssdbs.com/welcome/
Cheers, Tom


Comments
Renovating cars can be very frustrating, it seems whenever you decide to put some hours in in the garage something crops up, and before you know it it's been two weeks since you've been near the project.
Isaydingdong are brilliant, I've used them quite a bit. Can't wait to read more updates.
I know someone restoring a DB5 over 10 years part time and still going strong!!
A great read I will track this thread with great interest.
Cheers :007)
A few more photos from this week's progress...
Finally! A body part goes into the paint booth for the first material: the original primer/sealer was a lacquer based, red oxide primer. This new material is a 2 part epoxy red oxide primer, which, naturally is not available in California, so a 6 hour drive north, and... viola! This modern sealer adheres far better to the aluminum, and provides a flexible, long lasting seal. Very good to paint over.
This is another favourite part of the restoration. On the left is an original, unobtainium, Armstrong front damper. Thanks to AMOC member Cliff B. for mailing this piece all the way to CA from the UK, and I worked with a company here in San Francisco to reproduce the decal. I also scanned the paint on the damper in order to accurately match the paint. Loads of detective work involved to determine if this Armstrong decal was, in fact, correct to the period. Another fellow AMOC member sent a photo of his car, which had them, and confirmed our theory...
An original Armstrong front damper...well, not exactly.
The outer casing was of the non rebuildable type, sealed unit. Using a lathe, my master machinist carefully removed the seal, cutting through crimps and tack welds, and we removed the innards. Studying them, I found a Koni equivalent, which is also adjustable. Engineered some adapters for the innards, then made a special gland nut which resembles the original seal, welded up a threaded collar, painted the casing, and assembled it all. Now, I have the gorgeous, original outer casing, and modern innards. I have not seen any DBS cars still with original Armstrong dampers fitted. Should be a plus on the concours scene.
This is what it all looked like.
"Radio Roy," our resident radio expert, rebuilt the Motorola 828T unit, using two to make one. Modern innards and iPod compatible. I am going for the mono sound, which was original. Very tempted to use modern speakers and all, however, I do wish to experience a 1969 car, with only brakes and some dampers uprated for safety. This car shall even use the original Lucas points type distributor, and not an electronic ignition system.
Please follow all of the progress on OHMSSDBS.com.
Thank you all for the lovely comments!
Tom