Her Majesty's DBS Update: Facelift!
 Gebruder Gumbold
San FranciscoPosts: 549MI6 Agent
Dear AJB Friends,
Very busy month for Her Majesty's DBS...
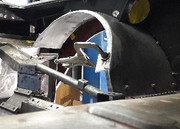
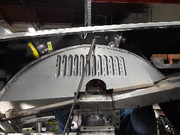
The old inner wing panels were cut out, and the remaining flange received a great deal of hammer and dolly treatment. The old panels were cut out from below, to save the original flange, which has the original spot welds.
Yes, only I would care about that, part of the sickness!
New panels were purchased from a UK supplier, ASR Coachwork UK, and trimmed to shape. Welded in using a MIG welder, which best replicates the old fashioned stick welding used at the David Brown plant in Huddersfield.
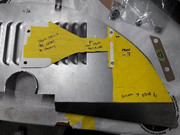
I made a template for the holes to mount the coolant reservoir tank. Very important to get the tank level correct, as the cap needs to be a few degrees higher when the car is at its ride height. Had to do some measurements, and welded nut plates cut from the old panel to complete the job.
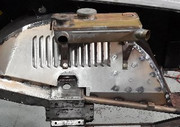
Tank can now be refinished as all the welding and messy work has been completed. It will be sent to my favourite radiator men for a leak test first. I am going to use Evans Waterless Coolant now, as it comes highly recommended. There are a few videos on YT, from Jay Leno, on the subject.
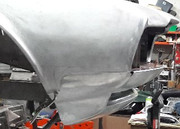
Back on the Sharknose panel, the new face is offered up and trimmed.
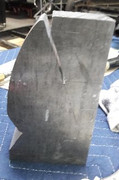
One of the hammer forms used to construct the panel. The wooden buck is just to check and adjust fit, not to be hammered on! The factory had the luxury of a cast ally and iron hammer buck, which would cost about $100,000 these days, to make. CAD technology would help, but the complicated Sharknose shape dictates several different hammer bucks...
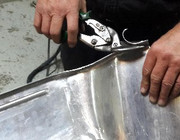
Always more fettling and trimming. On/off about 30 times before you weld...
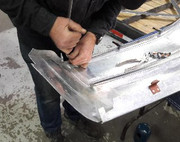
3/16" Stainless wire added to further stiffen the panel at higher speeds. This technique has been used for years on hand made aluminum cars. Aston Martin did not take this step here, and the lower panel can flex and crack paint. I have discretely improved the breed here. The aluminum is then folded over the wire, and sealed with seam sealer to prevent any moisture from doing its dirty work on my aluminum sculpture.
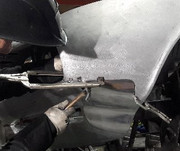
Finally! First welds are completed with a special MIG unit made for aluminum welding. Go slowly,and move the clamps around. preheat the ally with a blowtorch, which also drives away any moisture on the panel.
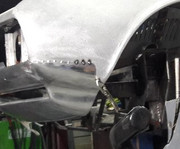


...And here is the money shot! Please note that the welding and hammering is not complete at this stage, but the basic shape is there, and I am quite happy wit the result. Crisp lines, and an excellent grille fit with a nice 1/8" gap. far better than what came from the factory in those days. I am allowing for a buildup of paint, which is very sad if forgotten, as there will be trouble upon fitting the grille after painting.
Hope you've enjoyed the update.
Work now will be all detail, and the last 10% of this project takes the most time, and costs the most amount of money!
No completion date yet, however, a lottery win would help things along nicely.
Really enjoying the process, even if it takes longer than expected, which is to be expected with these type of projects...
Cheers, Tom
Very busy month for Her Majesty's DBS...


The old inner wing panels were cut out, and the remaining flange received a great deal of hammer and dolly treatment. The old panels were cut out from below, to save the original flange, which has the original spot welds.
Yes, only I would care about that, part of the sickness!
New panels were purchased from a UK supplier, ASR Coachwork UK, and trimmed to shape. Welded in using a MIG welder, which best replicates the old fashioned stick welding used at the David Brown plant in Huddersfield.

I made a template for the holes to mount the coolant reservoir tank. Very important to get the tank level correct, as the cap needs to be a few degrees higher when the car is at its ride height. Had to do some measurements, and welded nut plates cut from the old panel to complete the job.

Tank can now be refinished as all the welding and messy work has been completed. It will be sent to my favourite radiator men for a leak test first. I am going to use Evans Waterless Coolant now, as it comes highly recommended. There are a few videos on YT, from Jay Leno, on the subject.

Back on the Sharknose panel, the new face is offered up and trimmed.

One of the hammer forms used to construct the panel. The wooden buck is just to check and adjust fit, not to be hammered on! The factory had the luxury of a cast ally and iron hammer buck, which would cost about $100,000 these days, to make. CAD technology would help, but the complicated Sharknose shape dictates several different hammer bucks...

Always more fettling and trimming. On/off about 30 times before you weld...

3/16" Stainless wire added to further stiffen the panel at higher speeds. This technique has been used for years on hand made aluminum cars. Aston Martin did not take this step here, and the lower panel can flex and crack paint. I have discretely improved the breed here. The aluminum is then folded over the wire, and sealed with seam sealer to prevent any moisture from doing its dirty work on my aluminum sculpture.

Finally! First welds are completed with a special MIG unit made for aluminum welding. Go slowly,and move the clamps around. preheat the ally with a blowtorch, which also drives away any moisture on the panel.


...And here is the money shot! Please note that the welding and hammering is not complete at this stage, but the basic shape is there, and I am quite happy wit the result. Crisp lines, and an excellent grille fit with a nice 1/8" gap. far better than what came from the factory in those days. I am allowing for a buildup of paint, which is very sad if forgotten, as there will be trouble upon fitting the grille after painting.
Hope you've enjoyed the update.
Work now will be all detail, and the last 10% of this project takes the most time, and costs the most amount of money!
No completion date yet, however, a lottery win would help things along nicely.
Really enjoying the process, even if it takes longer than expected, which is to be expected with these type of projects...
Cheers, Tom


Comments
Thanks awfully, Old Man. That's what you chaps in SMERSH call each other, right?
I have enjoyed the journey immensely, and the road ahead is still a long one.
Will it be worth it in the end? The smiles of spectators will tell me...
Thank you!
Funny how the Universe gives us a right boot in the caboose....and then, on the other side, if we trust and stick with it, good things happen.
Will be quite a story when I roll up on to the Concours green, and compete.
Thank you for the kind comments,
Tom