

OHMSSDBS Re-Restoration Update: Sharknose Panel Work
 Gebruder Gumbold
San FranciscoPosts: 541MI6 Agent
Gebruder Gumbold
San FranciscoPosts: 541MI6 Agent
Hello AJB,
Work has been progressing quite steadily on the Sharknose front panel for Her Majesty's DBS...
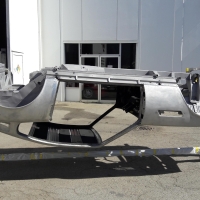
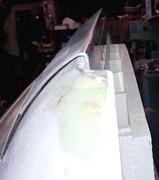
For those new to the project, the early, or S1 DBS cars featured this lovely, all ally "Sharknose," or "Sharkmouth" opening. My DBS was a Series 2 car, and to be Bond correct, it needed an entirely new face. Here is an example of a typical S1 sharkmouth front valance. So much metal work is needed to complete this facelift...
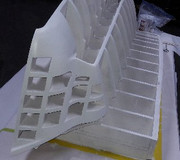
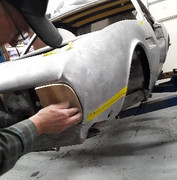
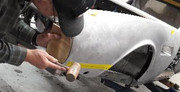
A buck was fashioned using templates from another early DBS. Not so fast...every Aston Martin is a hand made car, and absolutely no dimension is the same between any 2 cars. So, not only did we have to copy the basic shape, but sculpt to fit the dimensions of this car! This is only a checking buck, as hammer forms must be made to form the aluminum. Yet another series of photos to follow...

Here you see the culmination of many months of work. The individual pieces will then be offered up to the car, and reshaped as needed. The last photo shows that sweet curve, or pleasing radius that is so important to a lovely smile! I made a few different patterns, and chose the one that best suits the shapes on that sleek DBS body. I looked at plenty of photos, and actual cars, and I can safely say that this curve is what William Towns had intended. Many DBS cars have sagging front ends now- and we will find out why...
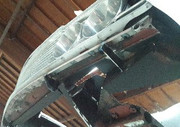
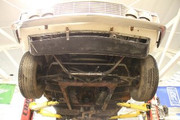
Look under the grille at the added steel reinforcement. The thin aluminum skin of the car must attach to a solid surface, and the chassis metal used here is too thin, and warps with time, as cars driven at speed put a tremendous stress on this metal, which buckles after time. We made an entirely new piece, or shelf, for the ally skin to fit over, and this will prevent wrinkles and sagging over time. A modern poly barrier will be used with stainless rivets, to prevent galvanic corrosion, which was present on this car.
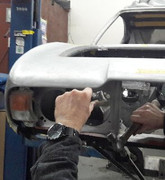
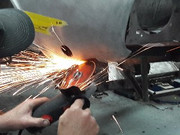
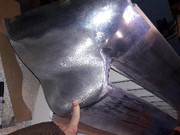
Now, the most critical part here is the fit of the grille. Often left for last, this step is necessary to do well before any paint goes on, to ensure a proper gap. I am going for a 1/8" pleasing gap all round, and this is how you do it...Wooden hammer bucks were fashioned to get the correct shape of the aperture, and much hammer and dolly work before any pieces can be offered up. Some brazing has to occur to fix cracks, then more hammering, etc.
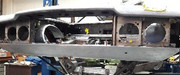
First offer up of the top outer panel, held in place by cleco fasteners. The entire sharkmouth builds from this piece, and the angle at which it sits determines everything. Recall how important the steel superstructure underneath is, as it provides a solid and non moving base for the aluminum. Inside the nose, I also made some steel brackets to reinforce the whole lot and keep everything solid. At this point the bumper is fitted several times, and pilot holes for the bumper mounts were drilled. Again, this cannot be done correctly unless the structure underneath is solid and the outer panel fits perfectly, which this one appears to do...
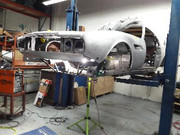
Hope that you've enjoyed this update. Next photos will show the bottom and sides of the aluminum mouth all coming together, and the inside louver panels going in- more metal work. When the metalwork has been completed, I can return the chassis to the rotisserie, and complete the stripping of the underside, and prep the engine compartment. Then, on to the paint shop for epoxy primer. That is still a long way off, and I appreciate all of the encouragement from my AJB friends.
Cheers, Tom
Work has been progressing quite steadily on the Sharknose front panel for Her Majesty's DBS...
For those new to the project, the early, or S1 DBS cars featured this lovely, all ally "Sharknose," or "Sharkmouth" opening. My DBS was a Series 2 car, and to be Bond correct, it needed an entirely new face. Here is an example of a typical S1 sharkmouth front valance. So much metal work is needed to complete this facelift...
A buck was fashioned using templates from another early DBS. Not so fast...every Aston Martin is a hand made car, and absolutely no dimension is the same between any 2 cars. So, not only did we have to copy the basic shape, but sculpt to fit the dimensions of this car! This is only a checking buck, as hammer forms must be made to form the aluminum. Yet another series of photos to follow...
Here you see the culmination of many months of work. The individual pieces will then be offered up to the car, and reshaped as needed. The last photo shows that sweet curve, or pleasing radius that is so important to a lovely smile! I made a few different patterns, and chose the one that best suits the shapes on that sleek DBS body. I looked at plenty of photos, and actual cars, and I can safely say that this curve is what William Towns had intended. Many DBS cars have sagging front ends now- and we will find out why...
Look under the grille at the added steel reinforcement. The thin aluminum skin of the car must attach to a solid surface, and the chassis metal used here is too thin, and warps with time, as cars driven at speed put a tremendous stress on this metal, which buckles after time. We made an entirely new piece, or shelf, for the ally skin to fit over, and this will prevent wrinkles and sagging over time. A modern poly barrier will be used with stainless rivets, to prevent galvanic corrosion, which was present on this car.
Now, the most critical part here is the fit of the grille. Often left for last, this step is necessary to do well before any paint goes on, to ensure a proper gap. I am going for a 1/8" pleasing gap all round, and this is how you do it...Wooden hammer bucks were fashioned to get the correct shape of the aperture, and much hammer and dolly work before any pieces can be offered up. Some brazing has to occur to fix cracks, then more hammering, etc.
First offer up of the top outer panel, held in place by cleco fasteners. The entire sharkmouth builds from this piece, and the angle at which it sits determines everything. Recall how important the steel superstructure underneath is, as it provides a solid and non moving base for the aluminum. Inside the nose, I also made some steel brackets to reinforce the whole lot and keep everything solid. At this point the bumper is fitted several times, and pilot holes for the bumper mounts were drilled. Again, this cannot be done correctly unless the structure underneath is solid and the outer panel fits perfectly, which this one appears to do...
Hope that you've enjoyed this update. Next photos will show the bottom and sides of the aluminum mouth all coming together, and the inside louver panels going in- more metal work. When the metalwork has been completed, I can return the chassis to the rotisserie, and complete the stripping of the underside, and prep the engine compartment. Then, on to the paint shop for epoxy primer. That is still a long way off, and I appreciate all of the encouragement from my AJB friends.
Cheers, Tom
Comments
Amazing!