

Her Majesty's DBS Progress
 Gebruder Gumbold
San FranciscoPosts: 541MI6 Agent
Gebruder Gumbold
San FranciscoPosts: 541MI6 Agent
Happy New Year to my fellow AJBers,
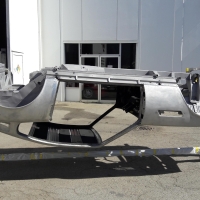
Progress on Her Majesty's DBS, while steady, has been quite slow, as the work on the body and chassis is very involved, and there had been some setbacks due to sublet delays. All part of the restoration process, and with a handmade car, the time deadlines go right out the window like TeeHee's arm!

To make an accurate "Sharknose" lower front valance, it was handy to have Grace Slick's old DBS on loan, and templates were made in order to fashion a wooden buck that the panel would then be formed on. Now, these templates will not fit our car, so once established, everything must be changed to match the dimensions of Her Majesty's DBS....recall what I wrote about "hand made cars?"
Now, after a year of sublet delay- the chap who was to complete the job for me kept it for a year, with promises galore, and never finished. He did drop the grille,which had to be straightened. These things happen, so moving forward, I mocked up the grille to the buck, and had to shorten the left side by nearly 1/2", and the back by the same amount to fit our car. You can see here what I am trying to accomplish, with most of the Series 2 lower valance cut away to show where the new sharknose (Series 1) piece shall go. Many other angles and curves to consider, but this is the basic idea...

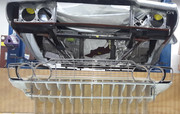
Cutting out the front wheel well section to add the S1 louvers.
Mock up of the louvers, which shall be TIG welded in, then metal finished. The entire car will then receive a coat of 2 part epoxy primer, in Red Oxide, as per the original. Well, the colour will be correct, however, in those days the primer was a 1 part lacquer based material, which hardened like a rock!
See other photos for rock removal...
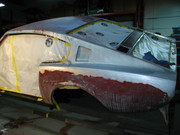
Original, caked on red oxide primer is slowly removed, wet sanding with 80g D/A. I use a special D/A with a very slow setting as to not cut into the thin aluminum. What a mess, but no dust in the shop, and a smoother cut. Also, I use about half of the 6" D/A sanding pads, which tend not to clog when wet sanding.
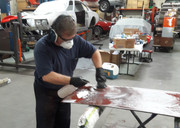
Example of yours truly using the wet sanding technique. Mop the floor afterwards! Such fun in winter, too!

The bonnet received her first coat of paint remover. Takes about 3 laps, then wet sanding to get a bare bonnet...

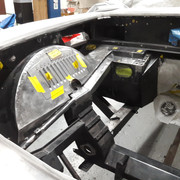
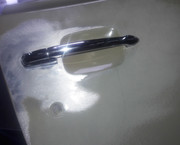
Another fun job is the fit of the S1 handles in a S2 door. What to do? Strip it all down and hire a special metal guru to close up the holes...

Which he did, beautifully, and I completed the job of creating the opening for the delicate handle of the S1 DBS cars...
...And here is the door, ready for removal of the temporary primer, then the door shall receive a coat of the red oxide 2 part epoxy primer, then it shall be hung on the body for the blocking process.
Plenty more to come, please visit my site: http://www.ohmssdbs.com/welcome/
I have updated hundreds of photos to the Second Restoration section, Coachwork, Suspension, etc.
Cheers, Tom
Progress on Her Majesty's DBS, while steady, has been quite slow, as the work on the body and chassis is very involved, and there had been some setbacks due to sublet delays. All part of the restoration process, and with a handmade car, the time deadlines go right out the window like TeeHee's arm!
To make an accurate "Sharknose" lower front valance, it was handy to have Grace Slick's old DBS on loan, and templates were made in order to fashion a wooden buck that the panel would then be formed on. Now, these templates will not fit our car, so once established, everything must be changed to match the dimensions of Her Majesty's DBS....recall what I wrote about "hand made cars?"
Now, after a year of sublet delay- the chap who was to complete the job for me kept it for a year, with promises galore, and never finished. He did drop the grille,which had to be straightened. These things happen, so moving forward, I mocked up the grille to the buck, and had to shorten the left side by nearly 1/2", and the back by the same amount to fit our car. You can see here what I am trying to accomplish, with most of the Series 2 lower valance cut away to show where the new sharknose (Series 1) piece shall go. Many other angles and curves to consider, but this is the basic idea...
Cutting out the front wheel well section to add the S1 louvers.
Mock up of the louvers, which shall be TIG welded in, then metal finished. The entire car will then receive a coat of 2 part epoxy primer, in Red Oxide, as per the original. Well, the colour will be correct, however, in those days the primer was a 1 part lacquer based material, which hardened like a rock!
See other photos for rock removal...
Original, caked on red oxide primer is slowly removed, wet sanding with 80g D/A. I use a special D/A with a very slow setting as to not cut into the thin aluminum. What a mess, but no dust in the shop, and a smoother cut. Also, I use about half of the 6" D/A sanding pads, which tend not to clog when wet sanding.
Example of yours truly using the wet sanding technique. Mop the floor afterwards! Such fun in winter, too!
The bonnet received her first coat of paint remover. Takes about 3 laps, then wet sanding to get a bare bonnet...
Another fun job is the fit of the S1 handles in a S2 door. What to do? Strip it all down and hire a special metal guru to close up the holes...
Which he did, beautifully, and I completed the job of creating the opening for the delicate handle of the S1 DBS cars...
...And here is the door, ready for removal of the temporary primer, then the door shall receive a coat of the red oxide 2 part epoxy primer, then it shall be hung on the body for the blocking process.
Plenty more to come, please visit my site: http://www.ohmssdbs.com/welcome/
I have updated hundreds of photos to the Second Restoration section, Coachwork, Suspension, etc.
Cheers, Tom
Comments
Congrats!
I wish I had your skills.
Please keep us posted -{
I am in awe of your dedication. -{
Keep up the good work and look forward to future updates.
Thanks for sharing with us!
Funny story about old Gracie. I was manning our AMOC display with 10 Heritage Astons at the San Francisco Auto Show, and while giving a tour to a group from the SF Art Academy, I noticed an elderly gent staring intently at the ex Grace black DBS, which the new owner, James Moore (what a great Bond fan name!), so generously lent to the display in lieu of my car, absent now 3 years...
I approached him and his wife, and he told me that he recalls this black DBS coming into a shop where he was renting space in Marin, probably Sausalito, back in the early 1970's. He was a cam grinder, and did performance work for Huffaker Engineering, a rather famous race team and shop in the SF Bay Area. Apparently, Ms Slick had blown the engine, and wanted another, but her budget was such that a secondhand Chevy V8 that had been removed from a boat was installed, with the ubiquitous automatic gearbox. Her DBS had originally been fitted with an autobox as well, according to the build sheet.
Gets better...
Apparently, there were very small cigarette burns in the back seat, and the car smelled, well, rather organic.
Even better...
Apparently, Grace was married at the time, and had a rather special relationship with her manager, himself also betrothed to another. The two, whilst allegedly inebriated on God-knows-what, raced each other across the GG Bridge. That story is cooberated by another feller who I had met in 2009, who was the arresting officer, long retired, who just happened to be at an Auto and Air show at the Half Moon Bay airport, that the black DBS, himself, and yours truly just happened to attend all at the same time.
Apparently, the "Drunken degenerate," as he put it, crashed her DBS into a pole and gave him lip to boot!
When James purchased the car years later, he replaced the front clip from another DBS section that he found in Needles, Ca, whilst on a camping trip with his daughter....The same daughter who was born at Stanford Hospital, and while James was out exploring the grounds, like any good expecting father should, he stumbled upon the DBS in a parking garage, under a cover, and it hadn't moved for years.
So...after three years of enquiries, visits, letters, etc, he was tipped off by a lady who worked in one of the many offices that he visited, on the day the car was to be auctioned for charity, and he was able to purchase the car, and bring her home to be cherished by he and his daughter.
When I first met Jim, he and his daughter had the door panels out and were fiddling with the power windows, which had quit.
He was kind enough to lend his beloved DBS to me to make templates from, and I endeavoured to repair the heating system, which had been lived in by a nice family of rodents....
The all important shape of the front wheel well....
Template made of my DBS's wheel well opening, aligned at the top with the buck and cut line on the left front wing.
See the black line? To the right of it is the profile of Jim's black DBS, and to the left is the profile of my DBS...so, the buck must be re-sculpted in that area to get a smooth, graceful arc.
There IS an end to this project....I keep telling myself!
Viola, the correct wheel well profile. About 10 hours to correct this, but who is counting?
Choosing the finish for the engine compartment. One of these shall be sprayed over the undercoating. I asked three known restorers of Astons, and all three came up with different answers, so I shall choose the one which my eye tells me is the closet to the original finish.
Thank you to everyone for the kind comments.
Dave, yes, I hope to do a video deal soon. I have the old nose-to-the-grindstone presently to finish the buck and hand it over to the metal shaper.
I do want to do the DAF scene re-enactment during reassembly, that features Q and a half disassembled DBS having the rockets lowered into the engine compartment.
That one should be fun, as we have an overhead hoist in the shop, and a phone to match.
Cheers everyone, and keep collecting Bond.
Tom