

Her Majesty's DBS Progress: January 2021
 Gebruder Gumbold
San FranciscoPosts: 541MI6 Agent
Gebruder Gumbold
San FranciscoPosts: 541MI6 Agent
Been at it day and night!
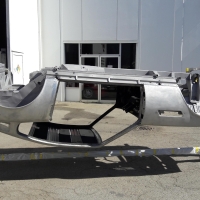
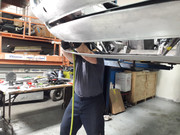
Lots of coachwork going on, and I am also restoring a DB6 for a customer, that was purchased in pieces, so it's a guessing game as to what goes where...quite the challenge..


The Sharknose panel is complete, and now attention turns to the front bumper again. Fit is absolutely critical, and here you see the steel bumper with a thick coat of copper, which will be block sanded, re-coppered, blocked again and finally chromed. Add 40 hours to the bill, and it should be about $3500 for chrome on both bumpers. Note the very good fit on the side, and even spacing to the front wing and bodywork. Initially, it was splayed out a bit, and now it follows the contours of the body. I always look for that fit when judging at concours events.
Yours truly with nose to the grindstone. Well, back to work, you've no idea how its piling up!
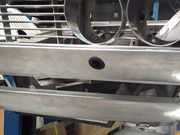
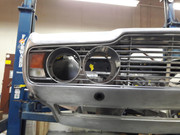
Creating the holes in the virgin aluminum for the bumper mounts. Took some planning to get it right, and I made a special pointer that fit into the bumper mount, and dimpled the centre of the hole, so it was a matter of transferring the hole centre to the other side, all by hand. Result is a very nice, symmetrical bumper fit, and have a look at that grille fitment: 1/8" gap all round!
Her smile is the most important, and most complicated part of the bodywork. As with people, the first thing you see is the smile of the car, and this is where I put the hours into. Shut lines, grille fit, contours, line extensions, etc all add up to a proper and pleasing result.
The Girling front calipers soda blasted and ready to plate in Yellow Passivate, very hard to do nowadays, and "illegal" in California*
* "illegal in California" means that Government contractors can perform that process and get away with it nicely. Cash is king! (Non traceable transaction...)
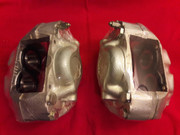

The completed front and rear calipers. Those are the handbrake extensions with pads on the rear calipers.
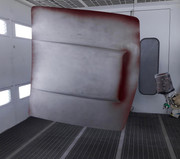
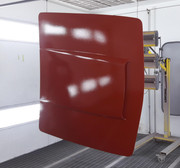


Body shop porn: The bonnet and doors are finally given their respective coats of 2 part epoxy red oxide primer. The correct colour as original, but far superior in their durability, coverage, and adhesion capability. The original red oxide primer was nitrocellulose, a deadly and not very long lasting material. I had to drive to Nevada to collect this primer, as, for some odd reason, they also don't sell that in Ca. You can buy grey or black, not red. Getting the idea that Ca is insane yet?


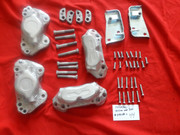
Lastly, when I test fitted the Lockheed brake servoes- 2 on the car, one for front, one for the rear brakes- I noticed that the brackets flexed under load. You wouldn't notice this while driving, as they are hidden away underhood, so I made some templates, cut some metal, and had my welder crack on. The brackets now are solid, and won't crack as the originals are prone to do. A trip to the powder coaters, and, viola, job done.
Next step is to mount the body on to the rotisserie, which will require the fabrication of brackets for the front as the Sharknose has changed things drastically, and strip the remainder of the underside. The body may then be prepped, and the whole business primed with the red oxide primer. I hear that Nevada is lovely this time of year...
Stay tuned for more updates, and please visit my site for more timely updates and photos: OHMSSDBS.com
Cheers, Tom
Lots of coachwork going on, and I am also restoring a DB6 for a customer, that was purchased in pieces, so it's a guessing game as to what goes where...quite the challenge..
The Sharknose panel is complete, and now attention turns to the front bumper again. Fit is absolutely critical, and here you see the steel bumper with a thick coat of copper, which will be block sanded, re-coppered, blocked again and finally chromed. Add 40 hours to the bill, and it should be about $3500 for chrome on both bumpers. Note the very good fit on the side, and even spacing to the front wing and bodywork. Initially, it was splayed out a bit, and now it follows the contours of the body. I always look for that fit when judging at concours events.
Yours truly with nose to the grindstone. Well, back to work, you've no idea how its piling up!
Creating the holes in the virgin aluminum for the bumper mounts. Took some planning to get it right, and I made a special pointer that fit into the bumper mount, and dimpled the centre of the hole, so it was a matter of transferring the hole centre to the other side, all by hand. Result is a very nice, symmetrical bumper fit, and have a look at that grille fitment: 1/8" gap all round!
Her smile is the most important, and most complicated part of the bodywork. As with people, the first thing you see is the smile of the car, and this is where I put the hours into. Shut lines, grille fit, contours, line extensions, etc all add up to a proper and pleasing result.
The Girling front calipers soda blasted and ready to plate in Yellow Passivate, very hard to do nowadays, and "illegal" in California*
* "illegal in California" means that Government contractors can perform that process and get away with it nicely. Cash is king! (Non traceable transaction...)
The completed front and rear calipers. Those are the handbrake extensions with pads on the rear calipers.
Body shop porn: The bonnet and doors are finally given their respective coats of 2 part epoxy red oxide primer. The correct colour as original, but far superior in their durability, coverage, and adhesion capability. The original red oxide primer was nitrocellulose, a deadly and not very long lasting material. I had to drive to Nevada to collect this primer, as, for some odd reason, they also don't sell that in Ca. You can buy grey or black, not red. Getting the idea that Ca is insane yet?
Lastly, when I test fitted the Lockheed brake servoes- 2 on the car, one for front, one for the rear brakes- I noticed that the brackets flexed under load. You wouldn't notice this while driving, as they are hidden away underhood, so I made some templates, cut some metal, and had my welder crack on. The brackets now are solid, and won't crack as the originals are prone to do. A trip to the powder coaters, and, viola, job done.
Next step is to mount the body on to the rotisserie, which will require the fabrication of brackets for the front as the Sharknose has changed things drastically, and strip the remainder of the underside. The body may then be prepped, and the whole business primed with the red oxide primer. I hear that Nevada is lovely this time of year...
Stay tuned for more updates, and please visit my site for more timely updates and photos: OHMSSDBS.com
Cheers, Tom
Comments
https://sistraininggear.com
P.S. You're doing a DB6 at the same time now! Amazing. Don't know how you do it. Will the DB6 work delay the DBS' completion?
Thanks all for the kind words. The DB6 job will finance getting the DBS to the finish line, whenever that will be. My primary business took a hit with Covid, and this DB6 was a Godsend to get some money in, so it can go right out again. I don't want to compromise the integrity of the work due to finances, so time is the one thing that goes on the back burner. I am also enjoying the build process, rather like building a Lego DB5- it's the process to enjoy.
Naturally, I have big plans for Her Majesty's DBS- with concours events, scene re-enactments, and the ultimate dream is to present her at her birthplace to Aston Martin Heritage in Newport Pagnell, and compete in the Concours of Elegance at Windsor Castle.
There are 3 main factors in any project: time, price, and quality. You want speed, then quality will be low, and the price will be high. You want quality, then speed will be low, and price will be high. You want price, then quality will be low, and the time high.
I am opting for highest quality at what I can afford, so the time element is the one that gets pushed back.
Would be nice to have her for October 21 in Las Vega$ for the DAF 50th, but I won't get my heart set.
It has also been difficult to sell off parts, unlike the old days where there would be bidding. It's a different ball game now, and the cash rich guys are cleaning up at auctions. The poor remaining Hobby Shop in the SF Bay Area is surviving. Most of the customers, though, aren't youngsters, they are middle aged farts like me who still fiddle with models and such. They were having a devil of a time receiving stocks before Christmas. Fortunately, they own the building and live upstairs. My dream is to have a combined hobby shop and auto museum/workshop, and live upstairs...
...And also be James Bond.
Cheers, Tom
Tom, I am as always amazed at the level of effort and passion you’re pouring into this project. Again, that tragic criminal act inflicted on your DBS was a blessing in disguise that has inspired your personal best.
About that hobby shop, which one is it? Parts of me died with the closures of San Antonio HS, Franciscan Hobbies, D&J Hobbies, Talbots, Toys r Us and (hopefully temporary) closure of the Hobby Company on Geary. I’ve yet to visit Hobby Lobby at the old Toys r Us in San Mateo.
Hi Superado!
J&M in San Carlos- the building resembles, and was built by, the same folks who built the SF Maritime Museum.
Worth a trip over there, and the chaps there are REAL hobby men. Forget Hobby Lobby, that is the fast food, Amazon of hobbies, as it is a chain with nothing but Chinese junk, and minimum wage millennials who lack the ambition to glue together a plastic airplane! Don't get me started.
Yes, it is true that the vandalism was a blessing in disguise. Rather an elaborate disguise, indeed. In the end, she will be the car of my dreams, in the exact specification that I want her to be. May go broke trying for perfection, but that is what life is about sometimes.
Hope to meet you someday when she is on the road.
Cheers, Tom
Your effort and enthusiasm are inspiring Tom.
Would be great to join you on one or more of your adventures when you bring the DBS over to the UK. I live very close to Gaydon, current home of Aston Martin and the British Motor Museum, perhaps a trip there could also be added to the diary..? {[]
I would love to meet any and all of my AJB brethren.
May be 2022 by the time I get round to finishing her,a nd able to afford a voyage, but I will keep everyone informed.
Don't forget to look on OHMSSDBS.com for any updates.
Cheers